I just got my confirmation email from Stampin' Up and I am now an official Demonstrator! I am SO excited! I signed up mainly to support my own habit but I already have a party lined up too! How fun is that? And a website!
http://stampinupwithdee.stampinup.net
Just a tip from one OCD stamper, if you are a little particular about ink on your stamps and/or wood blocks, always have a baby wipe next to your work area so you can immediately remove the ink from the stamp. Also, before you mount your stamps on the wooden blocks, coat each one with several coats of clear Polyeurathane. The ink will wipe right off and your stamps will always look like new! =) You can always go back and poly your already mounted stamps but BE CAREFUL not to get any poly on the rubber as it will harden and change how your stamped image will appear.
Monday, February 23, 2009
Tuesday, February 17, 2009
Blog Award!

This is really exciting! This is an award from my pal Allie at Allie's Creative Designs
. She is SO sweet!! Go check her out, she is a designer for Victoria Case Stamps and she creates some awesome cards!!! THANKS ALLIE!!!
Now, I am supposed to say 1 nice thing about the man in my life: Chris, you are totally amazing. You can accomplish ANYTHING and I love how hard you try.
Six ways I measure success in my life. I don't know that there are six ways. I know when I am happy. I know when I am loved. I know how happy my family and critters make me =). I know that my creativity and talent were given to me and that I need to strive hard everyday to develop further.
I also need to pass this award along to 5 others. That will take a little while but I promise to do so! Thanks again ALLIE!!! =)
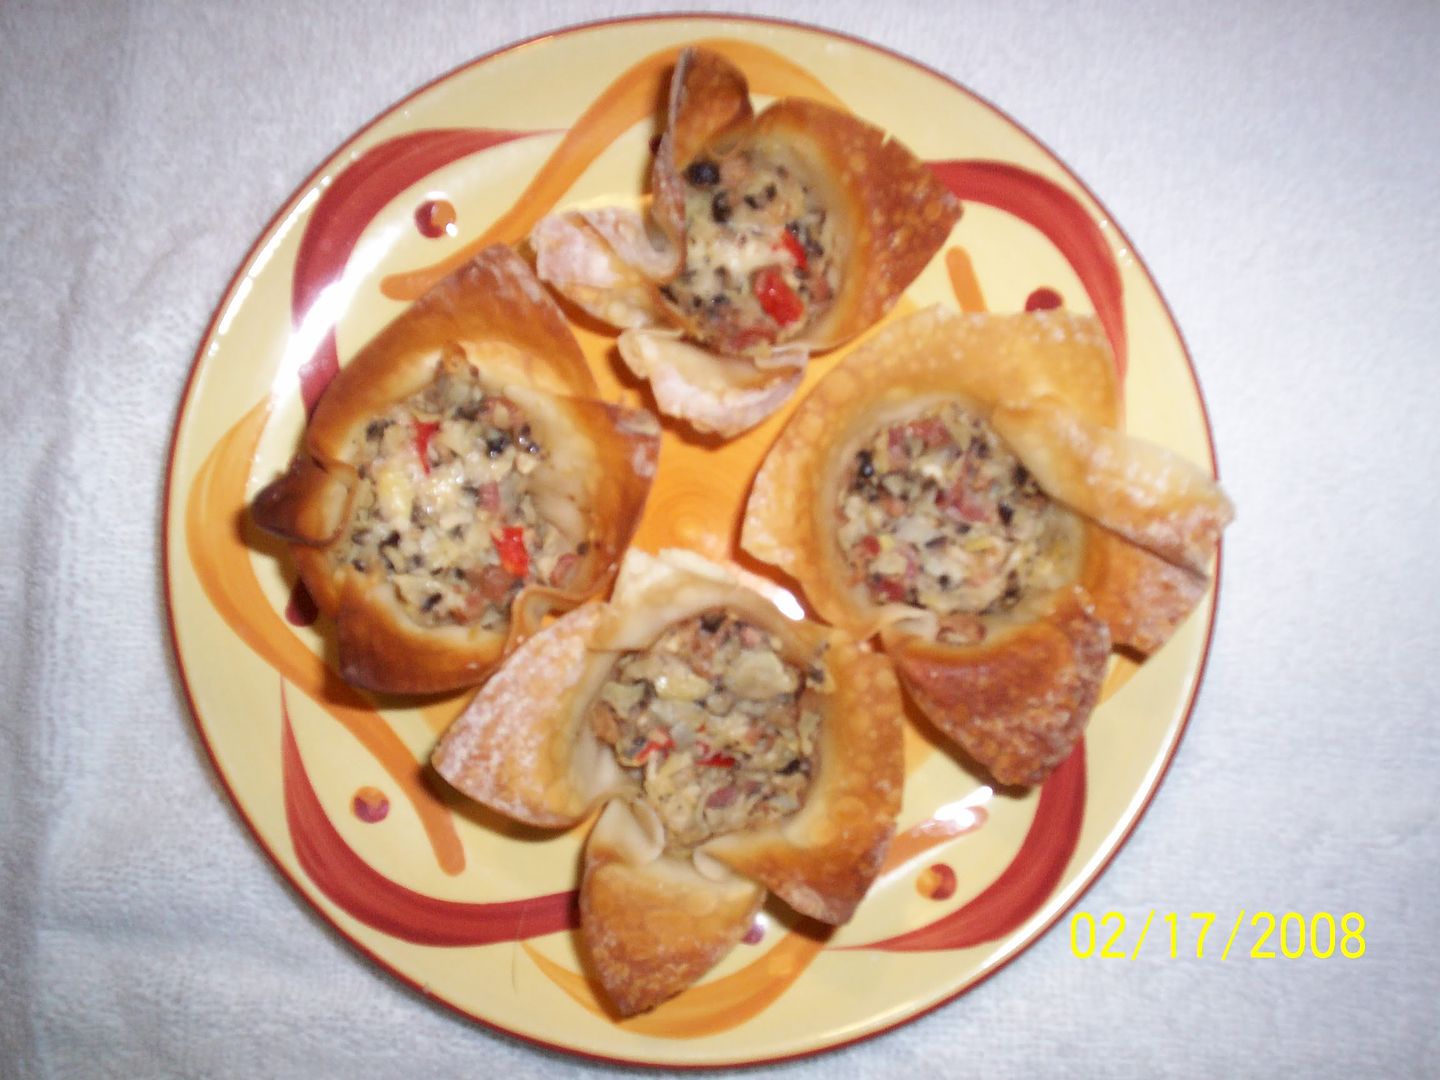
Cheesy Bacon Artichoke cups! YUMMO!!
Every Friday at 10a.m. everyone in our Department here at Texas A&M takes a break. Someone or some department sponsors the "Friday Coffee" and brings goodies of some sort. Some Friday's we have donuts and some Friday's we have breakfast tacos. From simple to gourmet, it just depends on the people/group. My friend Robin, Katie, Dr. Capps, Dr. Vedinov and I sponsored last Friday. We had some amazing goodies from a sausage/cheese/potato casserole to Garden Veggie Pizza. I made a Black Forest Trifle and these little guys! These are SO yummy and quick, if you need an appitizer/snack try them! If you are interested in the Trifle let me know! =)
24 wonton wrappers
1/2 cup mayonnaise
1/3 cup cooked chopped bacon (I use the vaccuum packed Hormel Real bacon pieces in the salad section!)
1/3 cup chopped black olives
1/4 cup chopped red bell pepper
2 (6.25 oz) jars of marinated artichoke hearts, drained and chopped
1 teaspoon minced garlic
1/3 cup fresh grated Parmesan cheese (a little Asiago is good too!)
Fresh ground pepper to taste
mini muffin tin
Preheat oven to 350 degrees.
Squish a wonton wrapper into each of 24 mini muffin cups to form a CUP. Mix all other ingredients and fill each wonton cup with approximatley 1 tablespoon of filling. Bake for 14-16 minutes or until wonton wrappers are golden brown and filling is bubbly. These are best served warm but even at room temperature they are great!
ENJOY! =)
Monday, February 9, 2009
What a Slacker! =(
I've been such a slacker! Man...I rushed to get everything done so I could feel good about leaving everyone for 5 days and then got home and have had SO much to do. I am still not completely caught up but I am beginning to see the light at least! Whew!
I went to CHA in Californa. WOW! There was SO much to see! Too much actually. I didn't get to play with new items and learn new techniques like I thought but 'looking' was nice. I was all set to really play and when that didn't happen I was so disappointed. Oh well, live and learn. Several of the booths had make and takes that I would have LOVED to do but there wasn't time or the line was longer than there was seating, etc.
On a brighter note, I went to a Stampin' Up party this weekend and we made a card using the coolest technique. I can't show you the technique simply because I don't have the supplies needed but I can tell you and then post a picture of the finished project!
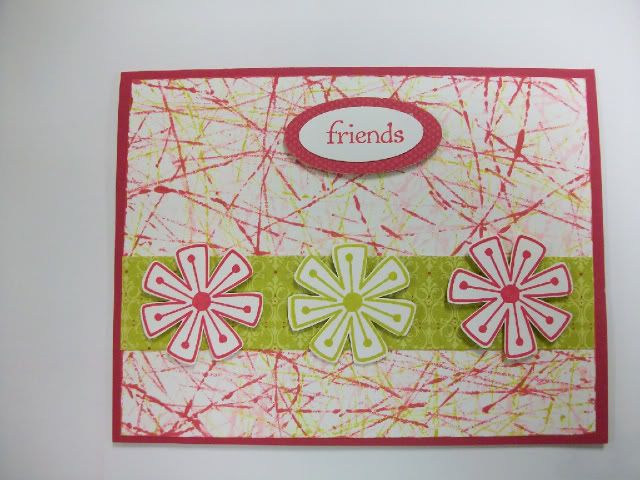
SO much fun! We took 3 of the plastic boxes that the rubber stamp sets are kept in and squirted a few drops of ink from the Stamp Pad Reinkers in a dark, medium and light color scheme, 1 ink per box. For our project we used a burgandy card base, white cardstock and an olive patterened paper so the inks were burgandy (really red I think), olive and rose. Put a piece of repositionable adhesive on the inside of the plastic box lid, several drops of one color ink and 3 glass marbles. Yep, like the kids used to play with. Now take your white piece of cardstock and stick it to the adhesive. Close the lid and start rolling and shaking the box so that the marbles make contact with the paper. Start with the darkest ink first in this case the really red. After you get a design you like, move to the second box-the next lighter color, in this case olive green. Last, the rose! What a great technique and the card is SO cute! You could use this for photo mats in scrapbooking too! Try it sometime! You will NEVER get the same look twice!! Let the kids help!!! =)
I went to CHA in Californa. WOW! There was SO much to see! Too much actually. I didn't get to play with new items and learn new techniques like I thought but 'looking' was nice. I was all set to really play and when that didn't happen I was so disappointed. Oh well, live and learn. Several of the booths had make and takes that I would have LOVED to do but there wasn't time or the line was longer than there was seating, etc.
On a brighter note, I went to a Stampin' Up party this weekend and we made a card using the coolest technique. I can't show you the technique simply because I don't have the supplies needed but I can tell you and then post a picture of the finished project!

SO much fun! We took 3 of the plastic boxes that the rubber stamp sets are kept in and squirted a few drops of ink from the Stamp Pad Reinkers in a dark, medium and light color scheme, 1 ink per box. For our project we used a burgandy card base, white cardstock and an olive patterened paper so the inks were burgandy (really red I think), olive and rose. Put a piece of repositionable adhesive on the inside of the plastic box lid, several drops of one color ink and 3 glass marbles. Yep, like the kids used to play with. Now take your white piece of cardstock and stick it to the adhesive. Close the lid and start rolling and shaking the box so that the marbles make contact with the paper. Start with the darkest ink first in this case the really red. After you get a design you like, move to the second box-the next lighter color, in this case olive green. Last, the rose! What a great technique and the card is SO cute! You could use this for photo mats in scrapbooking too! Try it sometime! You will NEVER get the same look twice!! Let the kids help!!! =)
Subscribe to:
Comments (Atom)
